Thursday, June 13, 2013
The front windows are in!
The last of the new windows are installed on the south side of the house. Take that Mr. Sun! I'll be adding pictures to this post in the next day or so.
Saturday, August 21, 2010
follow up - watch this space
We've vaulted the ceiling, demolished two of the interior walls, and put up a central wall to divide the two bedrooms. To save space a loft was built over the north wall (over the bedroom door). We will be demolishing the south wall interior and replacing the old wood windows with new and more efficient ones. It is still so hot that we will wait to do any more until the weather cools off. The room has sheet rock and electricity. The floor of the loft is about half decked with hardwood. There are two fluorescent lights. We will be covering the ceiling with the same cedar beadboard we used in the bathroom, and will install the ceiling fan and a ladder to the loft.
This weekend I will upload photos of the bedroom project.
We want to finish the bookcase frame before attaching the shelf track. First I'll sand the marks and other surface stuff, and then I'll put a clear varnish on the wood. There will be a lot of imperfections but it will be covered up by books so it won't be too visible.
Saturday, July 31, 2010
Part II -- The Bedroom
I haven't posted here since January but suffice to say we got the rest of the bathroom up and running. Sheet rock is all there but not textured. Shower and all fixtures work. We enjoy our bath. I'll try to fill in the blanks between January and early February when Tom took a contract job in Illinois.
In May Tom came back from Springfield with tentative plans to haul us all up north for the summer. Unfortunately business had fallen off so we seem to find ourselves with a little extra free time. What better occasion to do more things to the house?
The main problem we all have with the house at this point is a lack of privacy. David has taken to using the car as a reading room, and there are frequent disputes about who gets to do his schoolwork in a quiet room and who has to go outside. After drawing up elaborate plans for several additional rooms -- additional bedrooms, a master bath, a workshop and office, etc., we decided to split the kids' bedroom into two rooms and bump out the back wall to add square footage. This change won't affect other changes we plan to make later on.
Thursday, January 7, 2010
washer and dryer!!!
We moved the washer and dryer in last night. I painted the shelves and we started hauling appliances the minute the paint was dry. The appliances were covered with miscellaneous magnets and dryer lint. They just barely fit in the space -- I think there is about 1/8" of space left over. It is fantastic to be able to do laundry in the house. Even better, we can do hot water washes again (the garage only had cold water).
Tom had no trouble hooking up the water and gas and there were no leaks. He checked under the house and everything was fine there, but we have a lot of heat that is being wasted by venting directly outside. We are going to look into possibly filtering out the lint and directing the hot air back indoors (during the winter) It is very cold in the house and the new bathroom is the coldest part. Maybe some space heaters will do the trick? We had the A/C installed when we first bought the house, and they threw the heater in for free. Guess you get what you pay for. We would love something like a radiator or a pellet stove, but there's not much space. One thing is for sure: forced air is the worst possible way we could heat the house. The top foot of the room is toasty and the floor could probably double as an ice rink.
Meanwhile, I've just had the pleasure of doing a load of laundry without going outside. It is the coldest night of the year so I really appreciate it. Will add pictures when I can find the camera cord.
Monday, January 4, 2010
more progress on the laundry room
baseboard painted |
shelves up |
texture painted, cleaned up |
Well the laundry room is getting close. I finished cleaned up all the mess from the texturing and masked off the floor trim. Meanwhile Tom nailed up the shelf rails
 and cut cedar to trim the space between the wall and ceiling. I used some paint from the garage which doesn't quite match but it's close enough for the space behind a washer and dryer. Tom cut shelves which I will have to paint before we move the appliances into place.
We are still trying what to do for the sliding door. What we want is something with translucent panels kind of like a shoji screen. There are some beautiful sliding doors on the market but they cost a small fortune. Ikea has a nice looking metal/translucent door that is inexpensive and lightweight; unfortunately it was discontinued and the local store was out of the size we need. But they have a larger door we can cut down to size. Either that or take another pass through the Habitat for Humanity store and see if there is anything usable. That or build it from scratch.

Sunday, January 3, 2010
texturing and painting the laundry room


I finished taping, sanding, plastering etc. on the sheet rock.
At last I taped off the edges of the walls and put paper all around the ceiling.


The first bucket had just a small amount of paint left from the last room. It was so thick that I wound up spreading it with a putty knife and using the roller only for even texture. The new can of texture paint was plenty liquid, so it went faster after that. But paint splashed and splattered everywhere. I was prepared with old clothes, plastic gloves, goggles and a head scarf (I know from experience that sanded paint is hard to get out of your hair). It's not as even as I would like but it's good enough for the inside of a washer/dryer closet.
 Tomorrow we'll be finishing up so hopefully we can move the appliances inside. Note to self in future: do sheet rock and texture painting before laying down floor and ceiling materials. Also get some kind of mortar spreading tool instead of trying to use a putty knife.
Wednesday, December 30, 2009
cedar beam for the sliding panel door
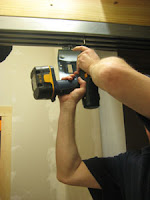
This is the track for the sliding panel that will hide the washer/dryer or serve as a privacy door for the shower area. We had to add another board so the door will clear the wall as it slides by, and put the rails up twice because we forgot the cars.
putting up the track
view from west side of room
![]()
Tom used 3 boards to mount the track and covered them with cedar so it looks like a single large beam. The bathroom smells great in this picture from all the cut cedar.
cutting the cedar

attaching the cedar beam

finished view from north side of room

putting up the track
view from west side of room

Tom used 3 boards to mount the track and covered them with cedar so it looks like a single large beam. The bathroom smells great in this picture from all the cut cedar.
cutting the cedar

attaching the cedar beam

finished view from north side of room
Subscribe to:
Posts (Atom)